Deletes files older than 30 days
forfiles /p "C:\sql.arch" /s /m *.* /D -30 /C "cmd /c del /Q /S @path"
forfiles /p "C:\sql.arch" /s /m *.* /D -30 /C "cmd /c del /Q /S @path"
Instalujemy po kolei
Microsoft Visual C++ Redistributable
Microsoft OLE DB Driver 19 for SQL Server (x64)
Microsoft SQL Server Migration Assistant (SSMA) for Access
SQL Server Management Studio (SSMS)
Uruchamiamy Migration Assistant (SSMA) for Access
Pomijamy Kreatora
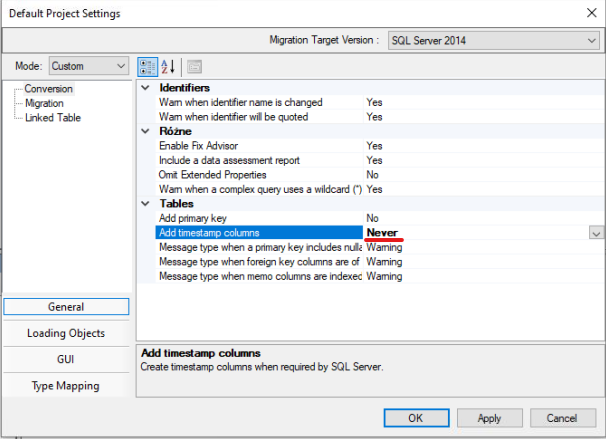
Tools -> Default Project Settings
Zmieniamy “Add timestamp column” na Never
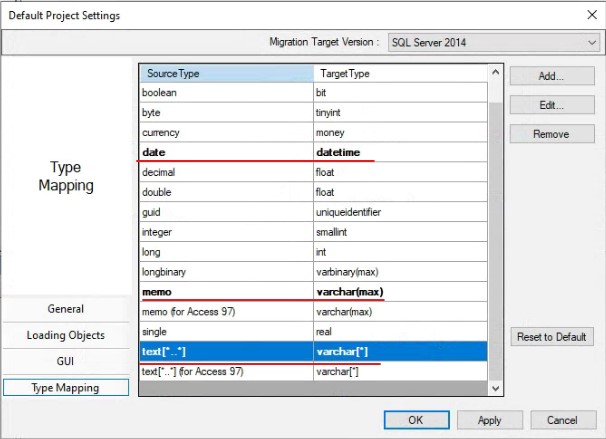
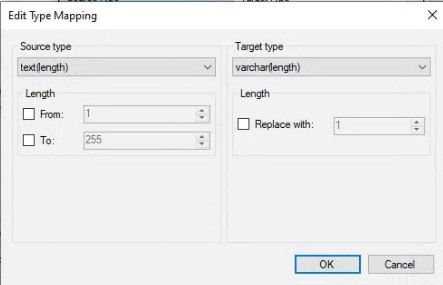
Tools -> Project Settings -> Type Mapping
zmieniamy
date na datetimetext[*..*]
text[*..*] na varchar[*]
memo na varchar[max]
Odpalamy kreatora, wybieramy bazę źródłową <nazwa>.mdb bazę docelową na serwerze MSSQL i wykonujemy konwersję.
Uruchom SQL Server Management Studio (SSMS) i usuń ograniczenia dotyczące zerowej długości wszystkich pól
polecenie poniżej wyświetli kwerendę która to zrobi
SELECT

ctu.TABLE_CATALOG

,ctu.TABLE_SCHEMA

,ctu.TABLE_NAME

,ctu.CONSTRAINT_CATALOG

,ctu.CONSTRAINT_SCHEMA

,ctu.CONSTRAINT_NAME

,cc.CHECK_CLAUSE

,[drop_statement]= 'ALTER TABLE [' + ctu.TABLE_CATALOG + '].['+ ctu.TABLE_SCHEMA+ '].[' + ctu.TABLE_NAME + '] DROP CONSTRAINT [' + ctu.CONSTRAINT_NAME +'];'

FROM [platnik].[INFORMATION_SCHEMA].[CONSTRAINT_TABLE_USAGE] ctu

join [platnik].[INFORMATION_SCHEMA].[CHECK_CONSTRAINTS] cc on ctu.CONSTRAINT_NAME=cc.CONSTRAINT_NAME
Uruchom SQL Server Management Studio (SSMS)
Utwórz konto dla bazy docelowej
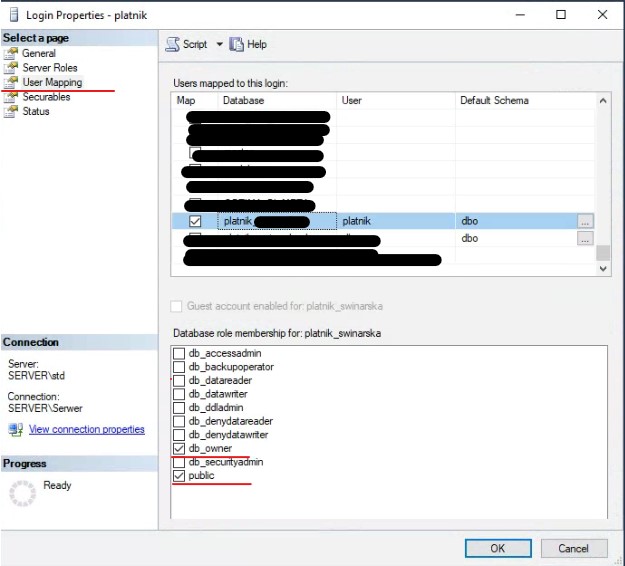
Security -> Logins
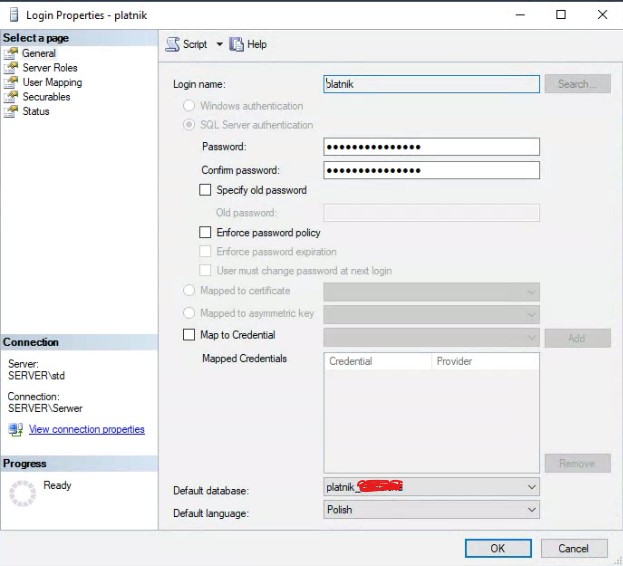
Przejdź do User Mapping i ustaw usera jako właściciela bazy
Podłączamy się pod serwer MSSQL używając MSSQL Server Authentication, podając usera i hasło
Jeśli dostaniemy błąd
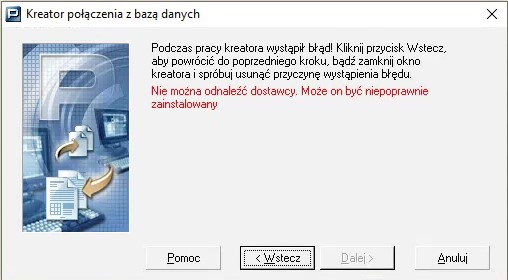
to zmieniamy sterownik połączenia z MSOLEDBSQL na SQLOLEDB (w moim przypadku musiałem tak zrobić pomimo migracji na MSSQL 2014 Standard)

Program accesspassview do odzyskiwania hasła do pliku mdb
| Version | Path |
|---|---|
| SQL Server 2022 | C:\Windows\SysWOW64\SQLServerManager16.msc |
| SQL Server 2019 | C:\Windows\SysWOW64\SQLServerManager15.msc |
| SQL Server 2017 | C:\Windows\SysWOW64\SQLServerManager14.msc |
| SQL Server 2016 | C:\Windows\SysWOW64\SQLServerManager13.msc |
| SQL Server 2014 (12.x) | C:\Windows\SysWOW64\SQLServerManager12.msc |
| SQL Server 2012 (11.x) | C:\Windows\SysWOW64\SQLServerManager11.msc |
mbr2gpt /validate /allowFullOS
mbr2gpt /convert /allowfullOS
Otwieramy pendrive instalacyjny z systemem ,wchodzimy do katalogu Sources i tworzymy plik ei.cfg
W plik ei.cfg wpisujemy:
(dla wersji Windows 8 Pro)
[EditionID]
Professional
[Channel]
Retail
[VL]
Dla zwykłego Windows 8 wpisujemy:
[EditionID]
Core
[Channel]
Retail
[VL]
Bitdefender Security for Virtualized Enviroments
default login: root
default password: sve
setup command: sva-setup
communication server: ip address:8443
update server configuration: ip:7076
Solution from http://miloszikic.blogspot.com/2010/07/fujitsu-siemens-amilo-launch-manager.html
For all of you that have Amilo laptops which don’t have Launch Manager available for new Win 7 here is simple solution to run your wireless again!
I spent quite a time until finally managed to enable this card. I thought that enabling card just in bios will do the trick but cards have to be enabled from inside os as well and since Launch Manager will not work in default installation this will not work.
And hopefully running Launch Manager in compatibility mode did the trick.
So steps are:
Control Panel - Administrative Tools - Local Security Policy
Local Policies - Security Options
Network security: LAN Manager authentication level
Send LM & NTLM responses

Minimum session security for NTLM SSP
Disable Require 128-bit encryption
Pobierz usługę Image Mastering API v2.0
Pobierz Windows7-USB-DVD-tool.exe
Zainstalować Windows Virtual PC.
Zainstalować Windows XP Mode (pl).
Przejdź do folderu C:\Program Files\Windows XP Mode\
Zmień właściciela i pełne prawa do tego pliku na swojego użytkownika.
Uruchom Windows Virtual PC
Kliknij na Utwórz Maszynę Wirtualną.
Nadaj nazwę i wybierz lokalizację (dowolne).
Wybierz “Użyj istniejacego wirtualnego dysku twardego”
i wybierz “C:\Program files\Windows XP Mode\Windows XP Mode base.vhd”